The following instructions will walk you through steps needed to update ComfyUI for AI Playground v2.5.5, allowing you to run Flux.1 Kontext [dev] or Wan 2.1 VACE workflows from ComfyUI.
About these workflows
Flux.1 Kontext [dev] from Black Forest Labs is a breakthrough image editing model and workflow, allowing you to edit, stylize, and combine images together, simply by telling the model what should change or be done. Currently this model is released as a developer version, meaning it is use restricted. Be sure to check the terms.
See example
Wan 2.1 VACE from Alibaba is high quality video generation model where you have high control on how the action of the video is generated, allowing you to use both reference images and reference video to control the generation.
See example

Both workflows require a newer version of ComfyUI than AI Playground installs by default. By following these instructions, you can run these new models and workflows in ComfyUI. Flux.1 Kontext can be run directly in AI Playground. However this requires you manually install models. We are looking at including these for future releases where everything needed to run is taken care of by AI Playground for installation and generation. For those interested in running these now we’ve provided instructions to get them installed. Note if you later need to reinstall ComfyUI through AI Playground, it will remove models and custom nodes installed. It is recommended to back up the ComfyUI models and custom_nodes folders.
Instructions
Step 1: Update ComfyUI:
Both workflows require an update of ComfyUI. This is the first step to running these features
- Install AI Playground without ComfyUI
- Under Basic Settings select Manager Backend Components
- To the far right of the ComfyUI row, select the gear icon, then Settings. Set version to “v0.3.43”
- Click the action to Install ComfyUI
- Workflow fix – Note this newer version has a required change in the LTX-Video Image to Video workflow, requiring “strength: 1.0,” to be added the LTXVImgToVideo Node. Download this updated version and place this in the [location of installation]/AI Playground/resources/workflows folder to fix
- After install restart AI Playground
- Launch AI Playground, then CTRL SHIFT I to see console window – wait for all tasks to complete
Step 2a: FLUX.1 Kontext:
No additional packages needed. Simply set up the workflow as described and run in ComfyUI. Tested on Intel Core Ultra 200V
- Launch AI Playground, CTRL SHIFT I to see console – wait for all tasks to complete
- Open ComfyUI in a web browser at localhost:49000
- In menu select New, Workflow, Browse Templates, FLUX, Flux Kontext Dev (Basic) – note This model is use restricted, for development and research purposes only
- The workflow will tell you are missing models. Install all models
- After models are downloaded move them as follow:
- flux1-dev-kontext_fp8_scaled.safetensors TO [location of AI Playground installation]/AI Playground/resources/ComfyUI/models/diffusion_models/
- ae.safetensor TO [location of AI Playground installation]/AI Playground/resources/ComfyUI/models/vae/
- clip_l.safetensors, t5xxl_fp16.safetensors AND t5xxl_fp8_e4m3fn_scaled.
safetensors TO [location of AI Playground installation]/AI Playground/resources/ComfyUI/models/text_encoders/
- Refresh your browser where ComfyUI is, and then load a reference image to edit using the Load Image Node
- In the Positive Prompt Clip node describe how the image should change ie describe a style (anime), or describe what in the picture should be removed or added, describe if it’s a different time of day, or if the character in the image should be different ie make a zombie etc
Example Workflows: Download then drag into ComfyUI
-
- Edit/Change an image (download workflow)
- Combine two images (download workflow)
Step 2b: Run FLUX.1 Kontext in AI Playground:
This will allow you to use AI Playground as the front end for Flux Kontext image editing. However you must first manually install the models in ComfyUI using Step 2a . Once done adding the below workflow json will allow you to run this directly from AI Playground
- Download this AI Playground workflow (json), and place this in [location of AI Playground installation]/AI Playground/resources/workflows
- Start AI Playground
- Go to Settings, Image tab, select Workflows, then select Flux-Kontext1
- Be sure steps are set to 20, number of images set to 1.
(in my experience small changes like remove a coffee cup, adding a mustache or sunglasses may not require many steps. Experiment with fewer steps. I’ve small changes look similar a 4 steps and 20 steps) - Load an image into the image field
- In the prompt on the create tab, describe what you want to change about the photo. Then generate
(generation will be slower compared to Flux Schnell, but you have more control, likely requiring less iterations)
![Screenshot of AI Playground running Flux.1 Kontext [dev] where the prompte "remove the microphone" having edited the image](https://game.intel.com/wp-content/uploads/2025/07/Screenshot-2025-07-09-150445-1-1024x576.png)
Step 3 Wan 2.1 VACE
This solution does require additional packages and models outside of what ComfyUI updates. This workflow was tested on an Intel Arc A770
Clone GGUF Nodes (outdated GGUF Nodes may need to be remove and updated)
- Open the directory [location of AI Playground installation]/AI Playground/resources /ComfyUI/custom_nodes
- Go to the title bar of this window and type CMD to launch Command window at this location.
- In the CMD window run each of these: (paste each line then hit return, wait for it complete then do the same for the next line)
- git clone https://github.com/city96/ComfyUI-GGUF
- git clone https://github.com/
Kosinkadink/ComfyUI- VideoHelperSuite - git clone https://github.com/Fannovel16/
comfyui_controlnet_aux
Install Node Depedencies
- Open the directory [location of AI Playground installation]/ AI Playground\resources\comfyui-
backend-env - Go to the title bar of this window and type CMD to launch Command window at this location.
- In the CMD window run each of these: (paste each line then hit return, wait for it complete then do the same for the next line)
- python -s -m pip install -r ..\ComfyUI\custom_nodes\
ComfyUI-GGUF\requirements.txt - python -s -m pip install -r ..\ComfyUI\custom_nodes\
ComfyUI-VideoHelperSuite\ requirements.txt - python -s -m pip install -r ..\ComfyUI\custom_nodes\
comfyui_controlnet_aux\ requirements.txt
- python -s -m pip install -r ..\ComfyUI\custom_nodes\
Download these GGUF models
- Download Wan2.1 14B VACE-Q8_0.gguf move to ComfyUI/models/unet
- Download umt5-xxl-encoder-Q4_K_M.gguf move to ComfyUI/models/text_encoders
- Download Wan21_CausVid_14B_T2V_lora_rank32.safetensors move to ComfyUI/models//loras
- Download wan_2.1_vae.safetensors move to ComfyUI/models/vae
Set up workflow
- Launch AI Playground, CTRL SHIFT I to see console – wait for all tasks to complete
- Restart AI Playground one more time , CTRL SHIFT I to see console – wait for all tasks to complete
- Open browser to localhost:49000
- Download either of these workflows and drag into ComfyUI
- Image to video with LoRA on (download workflow)
- Reference Video for Control (download workflow)
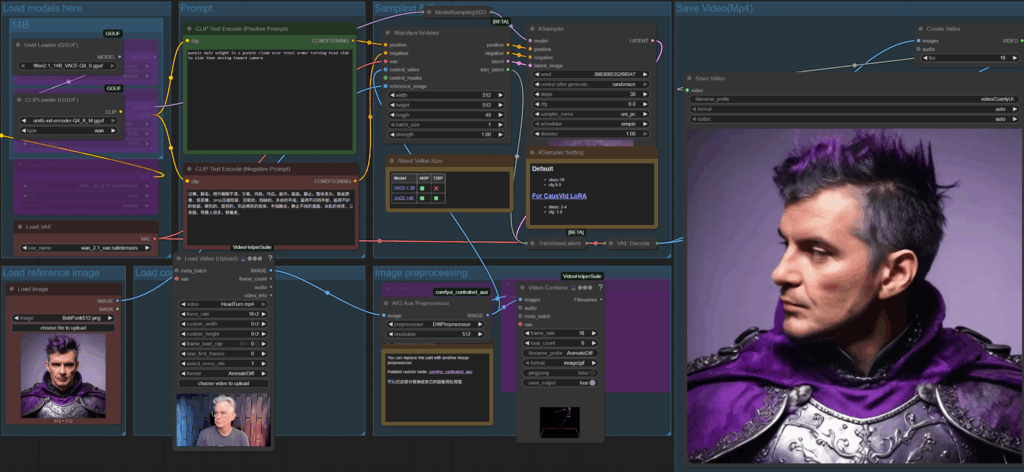
Notes on running
- The following nodes should be off/pink (to toggle a node on or off select the node and type CTRL B)
- 3B Nodes: Load Diffusion, Load Clip, Load Lora
- 14B Nodes: Load Diffusion, Load Clip
- Optional: Turn off the 14B Group LoRA for higher quality but longer generation
- Set values in K Sampler
- If LoRA is off then set samples to 20 and CFG to 6
- If LoRA is on then set samples to 4 and CFG to 1
- Add in a reference image (best is background is solid color) and set the values of the Wan Vace node to match the resolution. Set number of frames (suggest 49 to start)
- Describe what is happening in the positive clip prompt
- For the Reference Video version, add in a control video to guide the action – length should be the same length of the desired clip – resolution doesn’t need to match
There you have it. We will work to get these workflows part of an upcoming release, making these steps unnecessary. Meanwhile enjoy experimenting with these models. Be sure to adhere to their terms, and if you have questions or comments, drop us a line at http://discord.gg/intel in the ai-playground threads, or chat with me on X @bobduffy or linkedin – Bob Duffy.