Easily Run a Variety of LLMs locally with Intel® Arc™ GPUs
Generative AI has changed the landscape of what’s possible in content creation. This technology has the potential to deliver previously unimagined images, videos and writing. Large language models (LLMs) have been making headlines in the age of AI, allowing anyone to prompt their way to generate song lyrics, get answers to complex physics questions, or draft an outline for a slide presentation. And these AI features no longer need to be connected to the cloud or subscription services. They can run locally on your own PC, where you have full control over the model to customize its output.
In this article, we’ll show you how to set up and experiment with popular large language models (LLMs) on a PC with the Intel® Arc™ A770 16GB graphics card. While this tutorial will make use of the Mistral-7B-Instruct LLM, these same steps can be used with a PyTorch LLM of your choosing such as Phi2, Llama2, etc. And yes, with the latest Llama3 model too!
IPEX-LLM
The reason we can run a variety of models using the same base installation is thanks to IPEX-LLM, an LLM library for PyTorch. It is built on top of Intel® Extension for PyTorch and contains state-of-art LLM optimizations and low-bit (INT4/FP4/INT8/FP8) weights compression – with all the latest performance optimizations for Intel hardware. IPEX-LLM takes advantage of the Xe-cores XMX AI acceleration on Intel discrete GPUs like Arc A-series graphics cards for improved performance. It supports Intel Arc A-series graphics on Windows Subsystem for Linux version 2, native Windows environments, and native Linux.
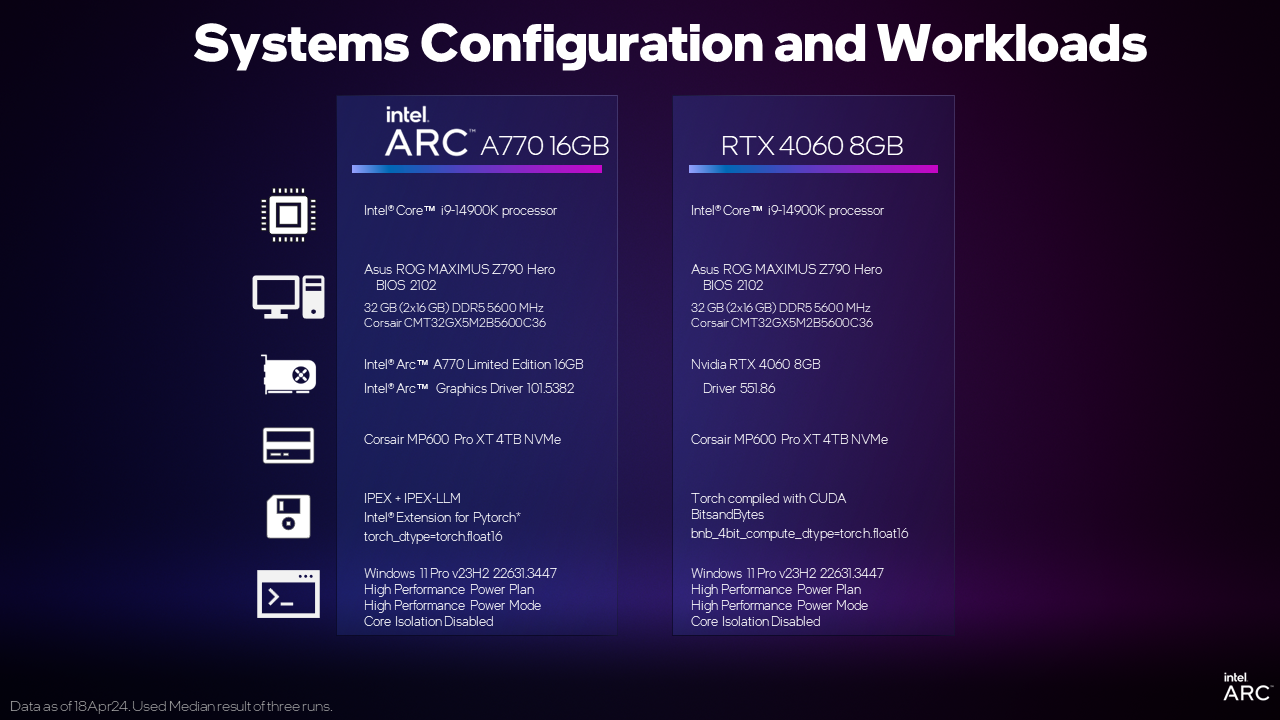
And because all of this is native PyTorch, you can easily swap PyTorch models and input data to run on an Intel Arc GPU with high performance acceleration. This experiment would not have been complete without a performance comparison. Using the instructions below for Intel Arc and commonly available instructions for the competition, we’ve looked at two discrete GPUs positioned in a similar price segment.
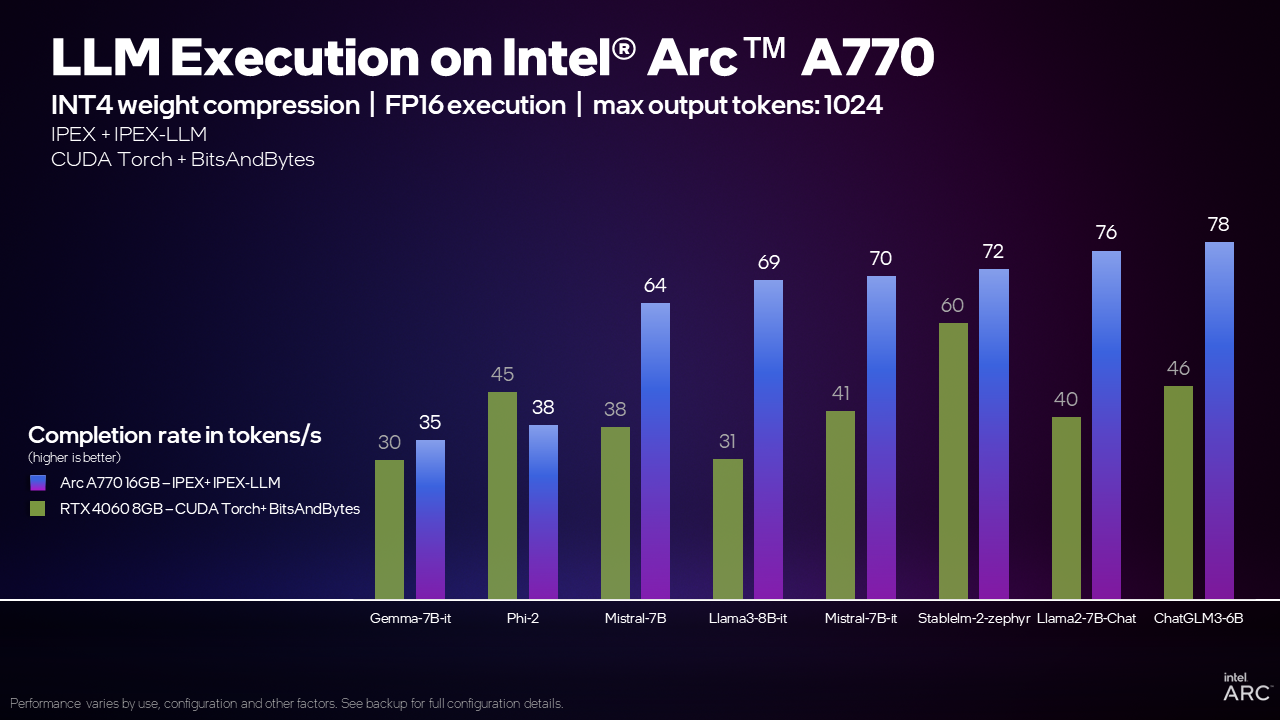
For example, when running the Mistral 7B model with the IPEX-LLM library, the Arc A770 16GB graphics card can process 70 tokens per second (TPS), or 70% more TPS than the GeForce RTX 4060 8GB using CUDA. What does that mean? A general rule of thumb is that 1 token is equivalent to 0.75 of a word and a good comparison is the average human reading speed of 4 words per second or 5.3 TPS. The Arc A770 16GB graphics card can generate words much faster than the average person can read them!
Our internal testing shows that the Arc A770 16GB graphics card can deliver this capability and competitive or leading performance across a wide range of models compared to the RTX 4060, making Intel Arc graphics a great choice for local LLM execution.
Now let’s go to set up instructions to get you started with LLMs on your Arc A-series GPU.
Installation Instructions
We can also refer to this page for setting up the environment: Install IPEX-LLM on Windows with Intel GPU — IPEX-LLM latest documentation
1. Disable integrated GPU in device manager.
2. Download and install Anaconda.
3. After installation is completed, open the Start menu, search for Anaconda Prompt, run it as administrator, and create a virtual environment using the following commands. Enter each command separately:
conda create -n llm python=3.10.6

conda activate llm

conda install libuv

pip install dpcpp-cpp-rt==2024.0.2 mkl-dpcpp==2024.0.0 onednn==2024.0.0 gradio

pip install --pre --upgrade ipex-llm[xpu] --extra-index-url https://pytorch-extension.intel.com/release-whl/stable/xpu/us/

pip install transformers==4.38.0
4. Create a text document named demo.py and save it to C:\Users\Your_Username\Documents or to the directory of your choice.
5. Open demo.py with your favorite editor and copy the following code sample into it:
from transformers import AutoTokenizer
from ipex_llm.transformers import AutoModelForCausalLM
import torch
import intel_extension_for_pytorch

device = "xpu" # the device to load the model onto

model_id = "mistralai/Mistral-7B-Instruct-v0.2" # huggingface model id

tokenizer = AutoTokenizer.from_pretrained(model_id)
model = AutoModelForCausalLM.from_pretrained(model_id, load_in_4bit=True, torch_dtype=torch.float16)
model = model.to(device)

messages = [
    {"role": "user", "content": "What is your favourite condiment?"},
    {"role": "assistant", "content": "Well, I'm quite partial to a good squeeze of fresh lemon juice. It adds just the right amount of zesty flavour to whatever I'm cooking up in the kitchen!"},
    {"role": "user", "content": "Do you have mayonnaise recipes?"}
]

encodeds = tokenizer.apply_chat_template(messages, return_tensors="pt")

model_inputs = encodeds.to(device)
model.to(device)

generated_ids = model.generate(model_inputs, max_new_tokens=1000, do_sample=True)
decoded = tokenizer.batch_decode(generated_ids)
print(decoded[0])
Code built from the sample code in this repository.
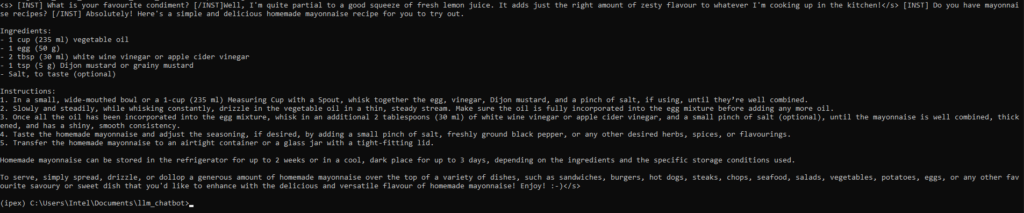
6. Save demo.py. In Anaconda, navigate to the directory that demo.py is located by using the cd command, and run the following command in the Anaconda prompt:
python demo.pyNow you can get a nice recipe for making mayonnaise!
Changing Models
Using the same environment that we set up above, you can experiment with other popular models on Hugging Face such as llama2-7B-chat-hf, llama3-8B-it, phi-2, gemma-7B-i, and stablelm2 by replacing the Hugging Face model id above in demo.py.
model_id = "mistralai/Mistral-7B-Instruct-v0.2" # huggingface model id

to

model_id = "stabilityai/stablelm-2-zephyr-1_6b" # huggingface model id
Different models might require a different version of transformers package, if you run into errors when launching demo.py, follow the below steps to upgrade/downgrade transformers:
- Open Anaconda Prompt
- conda activate llm
- pip install transformers==4.37.0
Verified transformers versions:
| Model ID | Transformers package versions |
|---|---|
| meta-llama/Llama-2-7b-chat-hf | 4.37.0 |
| meta-llama/Meta-Llama-3-8B-Instruct | 4.37.0 |
| stabilityai/stablelm-2-zephyr-1_6b | 4.38.0 |
| mistralai/Mistral-7B-Instruct-v0.2 | 4.38.0 |
| microsoft/phi-2 | 4.38.0 |
| google/gemma-7b-it | 4.38.1 |
| THUDM/chatglm3-6b | 4.38.0 |
Memory requirements may vary per model and framework. For the Intel Arc A750 8GB running with IPEX-LLM, we recommend using Llama-2-7B-chat-hf, Mistral-7B-Instruct-v0.2, phi-2 or chatglm3-6B.
Implementing a ChatBot WebUI
Now let’s move onto implementing a Gradio chatbot webui for a better experience using your web browser. For more information on implementing an interactive chatbot with LLMs, visit https://www.gradio.app/guides/creating-a-chatbot-fast
1. Create a document named chatbot_gradio.py in your text editor of choice.
2. Copy and paste the following code snippet into chatbot_gradio.py:
import gradio as gr
import torch
import intel_extension_for_pytorch
from ipex_llm.transformers import AutoModelForCausalLM
from transformers import AutoTokenizer, StoppingCriteria, StoppingCriteriaList, TextIteratorStreamer
from threading import Thread

model_id = "mistralai/Mistral-7B-Instruct-v0.2"

tokenizer = AutoTokenizer.from_pretrained(model_id, trust_remote_code=True)
model = AutoModelForCausalLM.from_pretrained(model_id, trust_remote_code=True, optimize_model=True, load_in_4bit=True, torch_dtype=torch.float16)
model = model.half()
model = model.to("xpu")
class StopOnTokens(StoppingCriteria):
    def __call__(self, input_ids: torch.LongTensor, scores: torch.FloatTensor, **kwargs) -> bool:
        stop_ids = [29, 0]
        for stop_id in stop_ids:
            if input_ids[0][-1] == stop_id:
                return True
        return False

def predict(message, history):
    stop = StopOnTokens()
    history_format = []
    for human, assistant in history:
        history_format.append({"role": "user", "content": human })
        history_format.append({"role": "assistant", "content":assistant})
    history_format.append({"role": "user", "content": message})

    prompt = tokenizer.apply_chat_template(history_format, tokenize=False, add_generation_prompt=True)
    model_inputs = tokenizer(prompt, return_tensors="pt").to("xpu")
    streamer = TextIteratorStreamer(tokenizer,  skip_prompt=True, skip_special_tokens=True)
    generate_kwargs = dict(
        model_inputs,
        streamer=streamer,
        max_new_tokens=300,
        do_sample=True,
        top_p=0.95,
        top_k=20,
        temperature=0.8,
        num_beams=1,
        pad_token_id=tokenizer.eos_token_id,
        stopping_criteria=StoppingCriteriaList([stop])
        )
    t = Thread(target=model.generate, kwargs=generate_kwargs)
    t.start()

    partial_message = ""
    for new_token in streamer:
        if new_token != '<':
            partial_message += new_token
            yield partial_message

gr.ChatInterface(predict).launch()
3. Open a new anaconda prompt and enter the following commands:
- pip install gradio
- conda activate llm
- cd to the directory that chat_gradio.py is located in
- python chatbot_gradio.py
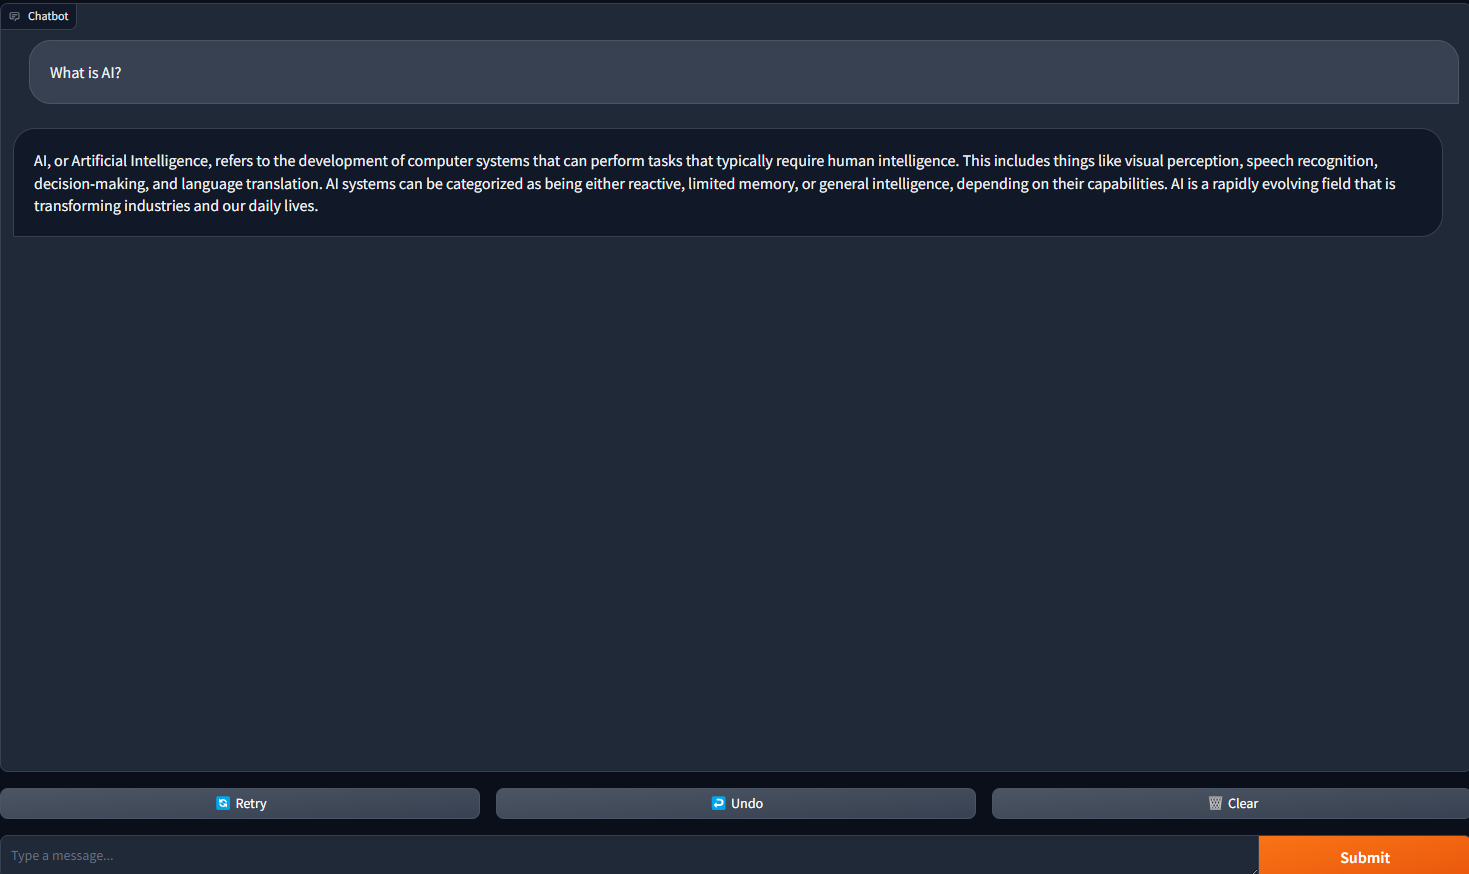
4. Open your web browser and navigate to 127.0.0.1:7860. You should see a chatbot set up with the mistral-7b-instruct-v0.2 language model! You now have a fancy looking webui for your chatbot.
5. Ask a question to start a conversation with your chatbot.
Notices and Disclaimers
Performance varies by use, configuration, and other factors. Learn more on the Performance Index site.
Performance results are based on testing as of dates shown in configurations and may not reflect all publicly available updates. See backup for configuration details. No product or component can be absolutely secure.
Results that are based on pre-production systems and components as well as results that have been estimated or simulated using an Intel Reference Platform (an internal example new system), internal Intel analysis or architecture simulation or modeling are provided to you for informational purposes only. Results may vary based on future changes to any systems, components, specifications or configurations.
Your costs and results may vary.
Intel technologies may require enabled hardware, software or service activation.
© Intel Corporation. Intel, the Intel logo, Arc, and other Intel marks are trademarks of Intel Corporation or its subsidiaries.
*Other names and brands may be claimed as the property of others.